

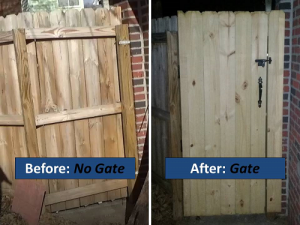
Our backyard is entirely fenced in, which I love. It keeps prying eyes off of our property, and it keeps rodents and neighbors’ leaves at bay. However, our trash service is in the alley behind our home, and the fence has (well “had”) no gate entry to the trash bins. Instead, we were bringing the trash bags through the garage. At first, this was not a problem, since we didn’t park our cars in the garage (we didn’t have garage door openers yet), and there was plenty of room to maneuver. But now with two cars in the garage, and an entry door that opens into the garage we quickly ran out of room to get our heavier/larger trash bags through. We did, however, have a section of fence that lay directly in front of the trash service area, and there were even existing steps down to the alley — but it was blocked by a fence…not a gate. I had to build one. And guess who doesn’t have any experience building gates? Yours truly! So I watched a few YouTube how-to videos (that were kinda related to our fence situation) and got to cracking. Here are the steps I followed and the tools I used to complete the job.
Gate Installation Steps (video following steps):
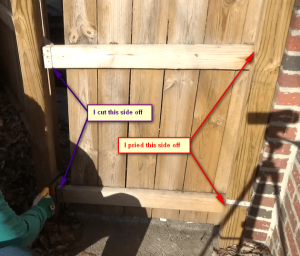
- I had 2-4×4 posts in the existing fence between which I wanted to make my gate. I took the gate slats (panels) off each of the 4×4’s so I could access the 2×4 cross beams I needed to cut through (to remove the fence section). Based on how these 2×4’s met with the 4×4’s, I cut through one side, but was able to pry the other side off with the back of a hammer.
Removing fence section - I brought the cut out segment to a pair of “table horses” but any flat surface would do.
- Here’s where I made the biggest mistake. To “frame,” or fortify my gate, I tried to build the frame with the remaining gate slats attached to the 2×4 cross beams. However, these beams were not applied squarely, so I had to take this whole segment of fence entirely apart, and build the frame separately.

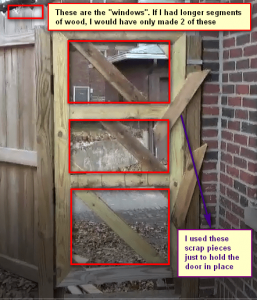
Pre-framing - Built a frame ~2.5-3″ smaller than where the gate would be set/placed. This allowed room for opening and closing, as well as the addition of a hinge. Based on the lengths of wood I had, I had to create 3 “windows” within my frame. Ideally I would have only made 2 “windows”
Gate frame 
What I wanted the frame to look like - Attached hinges to the door frame first. Then attached the hinge to the post I wanted it to swing. (I did this step backwards, and attached the hinge to the post first. This worked because I had someone with me to hold the weight as I screwed it in, but had I been alone it would have been way easier to screw the hinges into the gate frame first.)
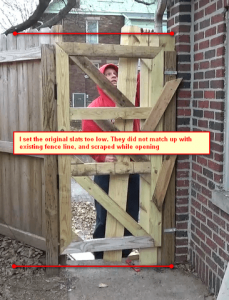
- Added new gate slats to the frame with hammer and nails (at least 2 nails per contact with the cross beams of the frame. This was another place where I made a mistake. Make sure that when you apply the slats so that the tops match the height of the existing fence line. Additionally, make sure that the door swings freely at that height. If at the current fence line height, the panels scratch the ground, you may have to saw off 1-1.5″ for full clearance. I also put slats on both sides of my frame, but this is personal preference — in my case the framing looked ugly and I wanted it covered)
Applying slats - Attached gate handle and latch according the directions on the pack. In my pack, they gave me bolts and washers that I didn’t want to use given my frame set up. Instead I used extra lag bolts (bolts with pointed tips) I had around. Also…I placed the handle/latch at the height that fit the”average” height of my wife and me.
How-To Video:
Tools Required:
1.) Hack saw (I also used a circular saw, but this is the cheaper option and worked just as well, if not better)

2.) Miter saw (could probably make the manual/old-school version work, but I got this bad mama-jamma off Craigslist for $60 with a brand new DeWalt blade)

3.) Drill (this gets bad Amazon reviews, but I got mine off Craigslist and it’s worked okay for me)

4.) Level (I actually found the smaller the level the better for the size gate I made).
5.) 2×4’s (I bought 2 from Lowe’s, and length really depends on your situation)

6.) Gate slats (the image link below is EXPENSIVE…just run to Lowe’s. Each slat was ~$1.50)

7.) 2.5″ outdoor screws (again, I’d buy them at Lowe’s/Home Depot, but Amazon link below)
8.) Gate hinges (heavier dutier the betterer)

9.) Gate latch/handle/lock by taste
10.) Hammer/crow bar (if you have existing slats to remove)
11.) Galvanized, outdoor nails with flat tops (Probably 1.25-1.5 inches long depending on slat thickness)