

My wife and I were recently painting our interior doors off of the kitchen, which unfortunately required us to remove the doors from their frames, and then take off the hardware. The problem with doing this in our house, is that the doors are extremely old, and therefore so are the screws that hold on the hardware. It only took a couple of doors until we ran into a snag, stripping the screws — applying too much pressure with the drill when the screws wouldn’t budge.
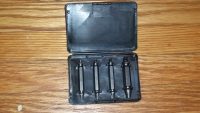
I had seen screw extractors at the store before, but I’ve never had a use for them — the screw either came out with a little extra force, I cut off the top, or I used pliers. In the case, none of these options worked. I searched around on Amazon, and found a set that had decent reviews (4 stars) and waited for them to arrive. In the meantime, I looked up YouTube videos on “How to use a screw extractor.” The process seemed simple enough, but what frustrated me, was that all of the demos on screw extractors were on screws that were intentionally stripped for the demo — i.e., the screw itself wasn’t lodged as demonically as true stripped screws are…but nonetheless, I held out for with positive energy.
The screw extractors arrived, I followed the instructions from the videos, and tweaked the process a bit for my actual stripped screw reality — and it worked! I was so pumped, and luckily I recorded the process to attempt to help others with the same problem…and to show the screw removal process in a real world situation.
Below are the step-by step instructions for how to extract a stripped screw, video how-to at bottom
Note: All steps are performed with the drill moving in the “remove screw” or counterclockwise setting.
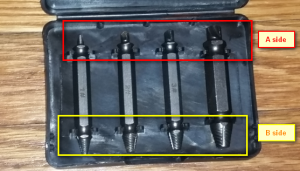
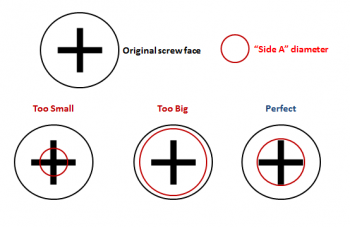
Step 1: Find the correct sized side A — this means the side A that fits fully into the stripped screw face (see diagram below). Insert side B of your correctly sized extractor into your drill, so that side A is the “active” side…i.e., the side that will be applied into the screw.
Step 2: Using the drill in the reverse setting, apply a significant amount of pressure to the screw face. You want to apply enough pressure to ream out the stripped metal. As you apply pressure, you should see metal filings slowly erupting from the screw face. Drill down until the hole in the screw face is smooth, and you can no longer see the phillips head markings.
Step 3: Flip the extractor, so side B is the active side. Using similar, if not more, force as step 2, press down into the newly reamed hole with side be (again with the drill in the reverse setting). The pressure down should be great enough that the friction between the screw face and side B dislodge the stuck screw and brings it to the surface.
If you prefer video instructions rather than written, please see the video below of me using the screw extractors for the first time!